Apple Notes er en brukervennlig app for å ta notater for å holde og organisere tankene og ideene dine på en Mac. Hvis du bruker det mye, må du dra nytte av de forskjellige tastatursnarveiene for å heve notatopplevelsen din. Disse snarveiene lar deg redigere, formatere og organisere notater raskere, og sparer deg for bryet med å navigere i menyer for enkle oppgaver.

Nedenfor har vi samlet en liste over viktige Mac-tastatursnarveier for Apple Notes. Vi viser deg også hvordan du lager egendefinerte snarveier for Apple Notes på en Mac. Fortsett å lese for å finne ut!
Beste hurtigtaster for Notes-appen på Mac
Mens du kan finne hurtigtaster for de fleste funksjoner i Apple Notes-menylinjen, har vi samlet noen av de viktigste for enkel referanse.
Grunnleggende snarveier for daglig bruk i Apple Notes
- Opprett et nytt notat: Kommando+N
- Lag en ny hurtignotat: Fn+Q (fungerer hvor som helst på Mac-en for rask tilgang til Notes, så lenge du ikke har endret tastaturinnstillingene)
- Dupliser et notat: Kommando+D
- Opprett en ny mappe: Shift+Kommando+N
- Vis eller skjul mapper/sidefelt: Kommando+Alternativ+S
- Vis hovedvinduet for notater: Kommando+0 (null)
- Flytt mellom sidefeltet, notatlisten og søkefeltet: Tab (dette fungerer ikke hvis du redigerer et notat for øyeblikket)
- Vis notater i en liste: Kommando+1
- Vis notater i gallerivisning: Kommando+2
- Vis vedlegg: Kommando+3
- Legg ved en fil: Shift+Command+A
- Koble til et notat: >>
- Skriv ut et notat: Kommando+P
- Slett et notat: Kommando+Slett (klikk på notatet du vil slette før du bruker snarveien)
- Avslutt Notes-appen: Kommando+Q
Snarveier for notatredigering og formatering
Formatering
- Bruk tittelformat: Shift+Command+T
- Bruk overskriftsformat: Shift+Kommando+H
- Bruk underoverskriftsformat: Shift+Command+J
- Bruk brødtekstformat: Shift+Kommando+B
- Bruk monostilt format: Shift+Command+M
- Bruk punktlisteformat: Shift+Kommando+7
- Bruk stiplet listeformat: Shift+Kommando+8
- Bruk nummerert listeformat: Shift+Kommando+9
- Bruk blokksitatformat: Kommando+’
- Bruk sjekklisteformat: Shift+Command+L
Skriftstørrelse og farge
- Vis fonter-vinduet: Kommando+T
- Fet tekst: Kommando+B
- Kursiv tekst: Kommando+I
- Understrekingstekst: Kommando+U
- Øk skriftstørrelsen: Kommando+Plusstegn
- Reduser skriftstørrelse: Kommando+minustegn
- Vis fargevindu: Shift+Kommando+C
Liste
- Øk listenivået: Kommando+]eller Tab
- Reduser listenivået: Kommando+[ or Shift+Tab
- Add a line break (soft return) to a list item or checklist: Shift+Return
- Insert a tab character in a list item: Option+Tab
- Mark or unmark a checklist item: Shift+Command+U
- Move a list or checklist item up in the list: Control+Command+Up Arrow
- Move a list or checklist item down in the list: Control+Command+Down Arrow
Other formatting shortcuts
- Create a link: Command+K
- Select an emoji: Control+Command+Space
- Copy style: Option+Command+C
- Paste style: Option+Command+V
- Show spelling and grammar: Command+Shift+: (the Shift key is included in this shortcut to press : instead of 😉
- Zoom in on note’s contents: Shift+Command+>
- Zoom out on note’s contents: Shift+Command+<
- Change size of note’s contents to default: Shift+Command+0 (Zero)
Searching and filtering
- Find in currently opened note: Command+F
- Find in all notes: Option+Command+F
- Find next: Command+G
- Find previous: Shift+Command+G
- Use selection for find: Command+E
- Jump to selection: Command+J
Table shortcuts
- Insert a table: Option+Command+T
- Add a row above the current one: Option+Command+Up Arrow
- Add a row below the current one: Option+Command+Down Arrow
- Add a column to the right: Option+Command+Right Arrow
- Add a column to the left: Option+Command+Left Arrow
- Move down a row or create a new row at the bottom: Return
- Move up a row or exit the table when at the first row: Shift+Return
- Go to the next cell on the right: Tab
- Go to the previous cell on the left: Shift+Tab
- Insert a new paragraph inside a cell: Option+Return
- Insert a tab character in a cell: Option+Tab
- Select cells across a row: Shift+Left Arrow or Shift+Right Arrow
- Select cells across a column: Shift+Up Arrow or Shift+Down Arrow
- Highlight the content of the current cell: Command+A
(If not inside the table, this shortcut selects the entire note.) - Highlight the entire table: Command+A (press twice)
(If not inside the table, pressing Command+A selects the entire note.)
Customizing keyboard shortcuts for Apple Notes on Mac
Some functions in the Notes app, like the Lock Note menu or the Check Spelling While Typing menu, don’t have keyboard shortcuts by default. However, you can create your own keyboard shortcuts for these. Here’s how:
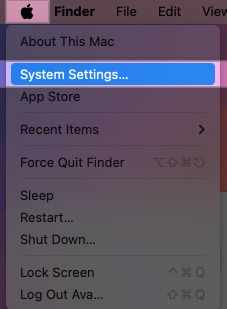
- Click the Apple menu in the top-left corner of your Mac and select System Settings.

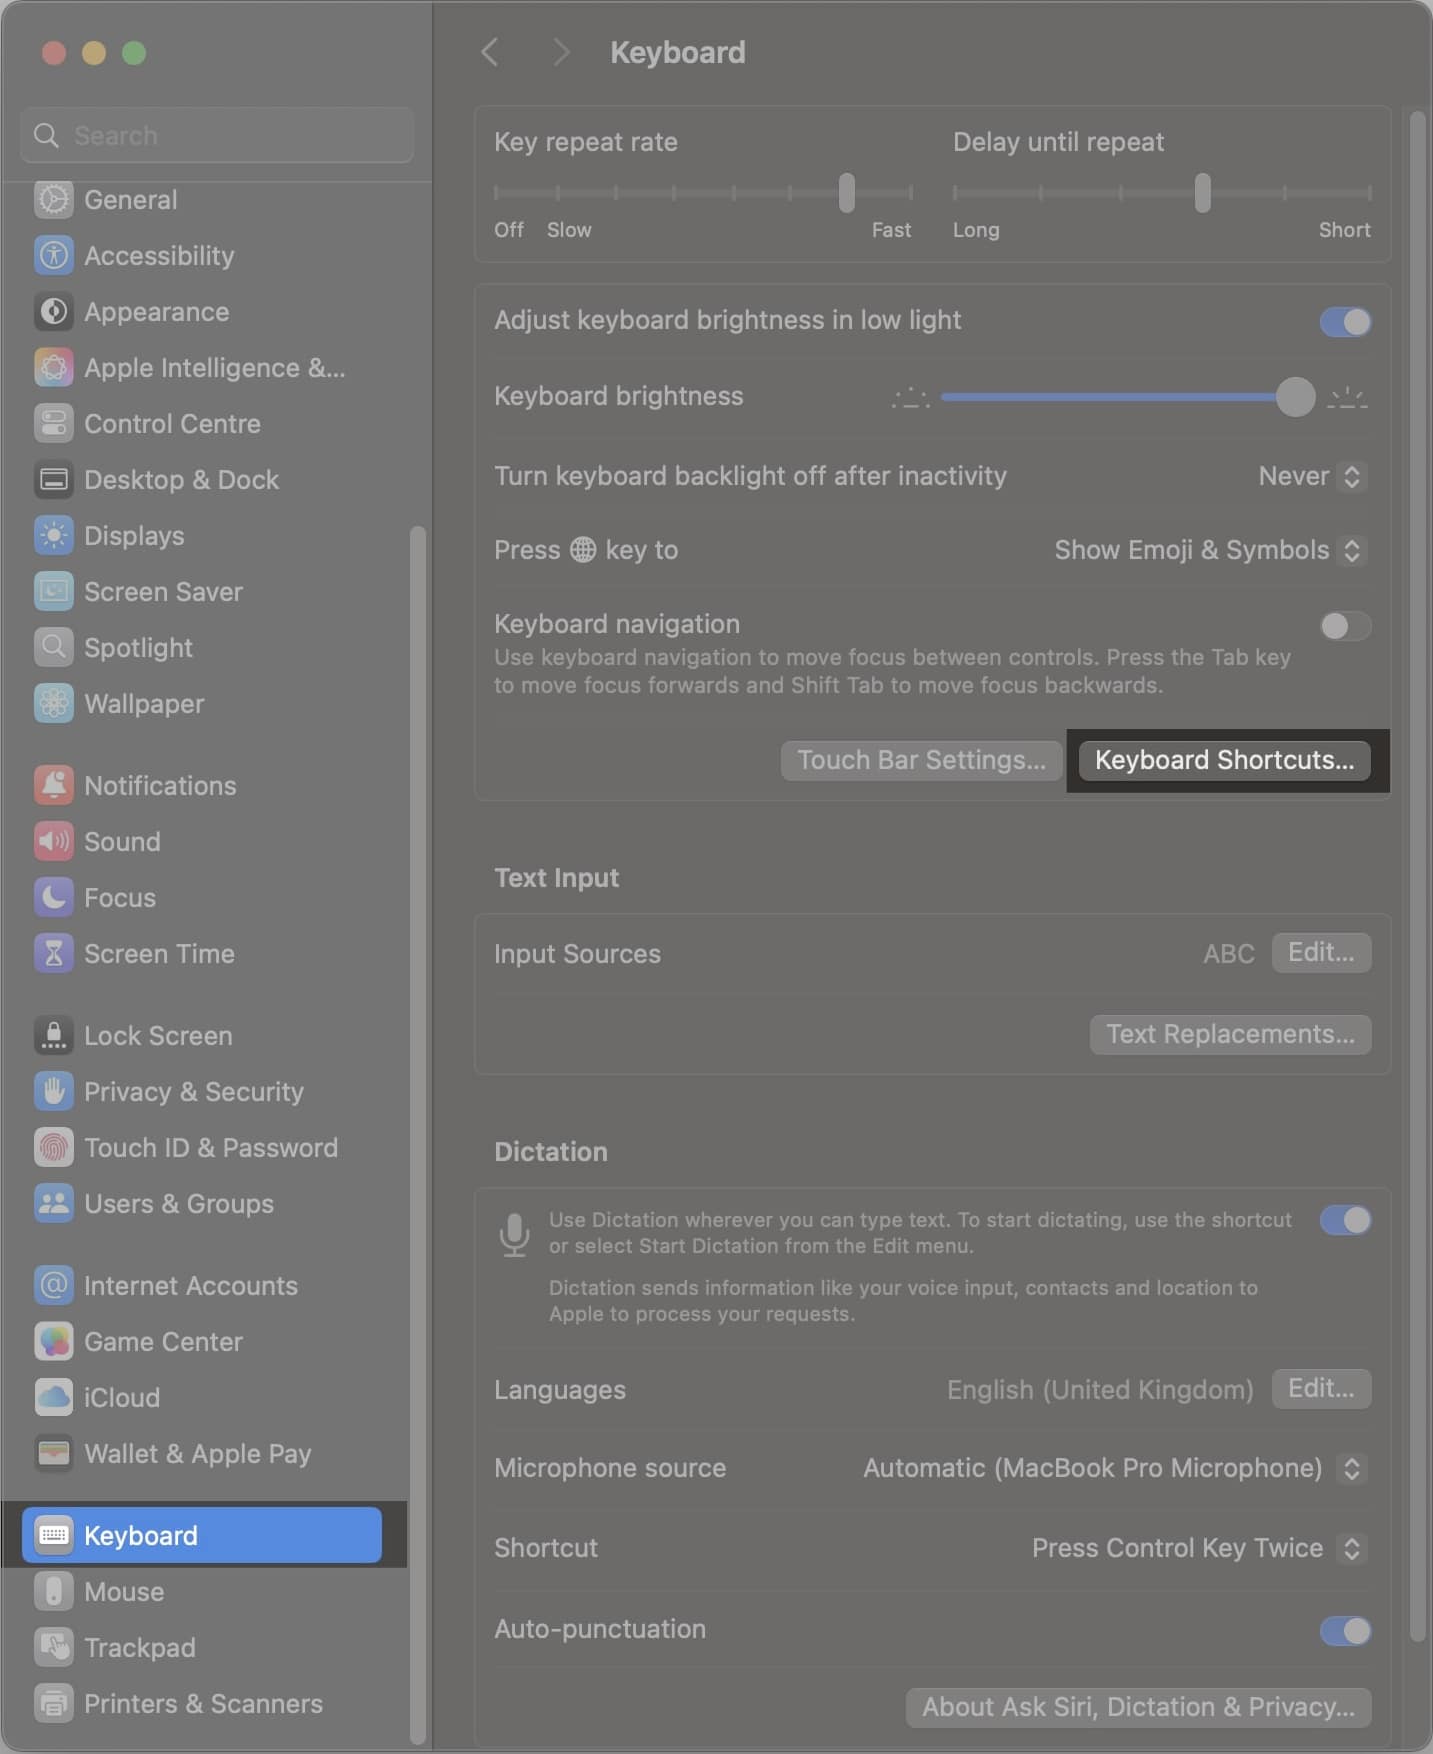
- Select Keyboard from the sidebar, scroll down, and click Keyboard Shortcuts.

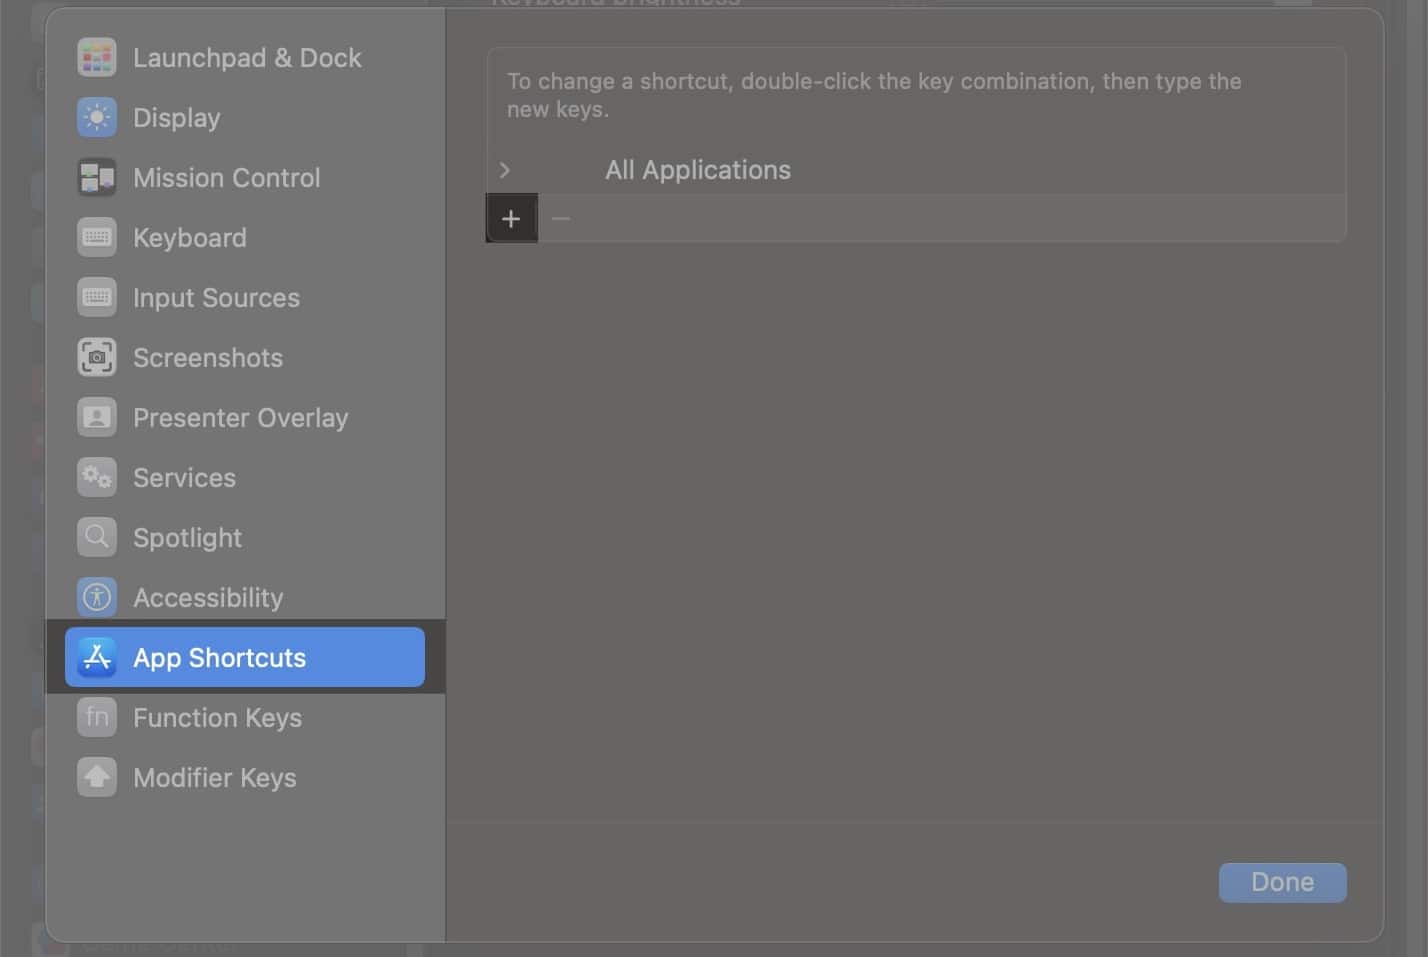
- Choose App Shortcuts from the left, then click the + icon under All Applications.

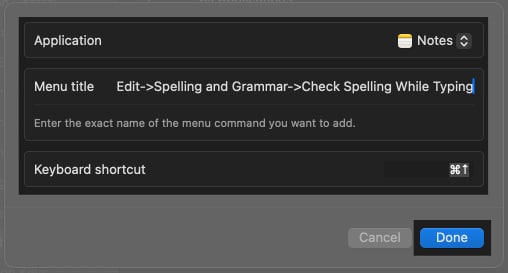
- Click the drop-down button next to Application and select Notes as the app you want to create a shortcut for.
- In the Menu Title field, type the exact command leading to the menu you want to assign a keyboard shortcut for as it appears in the Notes app. For example, if you want to create a shortcut for the Check Spelling While Typing menu, you need to enter: Edit->Spelling and Grammar->Check Spelling While Typing. Remember to use a hyphen before the ‘>’ symbol with no spaces in between each menu, and ensure the menu title matches exactly as it appears in the app.
- Click the Keyboard Shortcut field, press the key combination you want to assign, and then click Done.

Similarly, you can also customize existing shortcuts if the default options aren’t convenient for you.
Discover essential resources to help you unlock your Mac’s full potential!
- Ultimate Guide to Mac Option Key—This comprehensive guide covers all the hidden features and shortcuts of the Mac option key, helping you use it like a pro.
- 300+ Mac Keyboard Shortcuts for Beginners and Pros – Master your Mac with over 300 keyboard shortcuts designed to boost your productivity and make your workflow seamless.
Get them both now on Gumroad and level up your Mac experience!
Signing off…
The shortcuts above should have you covered on most fronts and reduce dependence on the mouse or Trackpad in the Notes app, especially for trivial actions. So go ahead and develop a command over them to improve your workflow in the Notes app on your Mac.
Also read:
- Why is my MacBook keyboard not working, and how can I fix it?
- How to check your MacBook battery cycle count and capacity
- How to link notes in Apple Notes in iOS 18 and macOS Sequoia